Wagtail Tutorial Series:
To learn more about Wagtail CMS, please check Build Blog With Wagtail CMS (4.0.0)
- Create Wagtail Project
- Modern Frontend Techs for Wagtail
- Dockerizing Wagtail App
- Add Blog Models to Wagtail
- How to write Wagtail page template
- Create Stylish Wagtail Pages with Tailwind CSS
- How to use StreamField in Wagtail
- Wagtail Routable Page
- Add Pagination Component to Wagtail
- Customize Wagtail Page URL
- Add Full Text Search to Wagtail
- Add Markdown Support to Wagtail
- Add LaTeX Support & Code Highlight In Wagtail
- How to Build Form Page in Wagtail
- How to Create and Manage Menus in Wagtail
- Wagtail SEO Guide
- Online Demo http://wagtail-blog.accordbox.com/
- Source code: https://github.com/AccordBox/wagtail-tailwind-blog
Wagtail Tips:
- Wagtail Tip #1: How to replace ParentalManyToManyField with InlinePanel
- Wagtail Tip #2: How to Export & Restore Wagtail Site
Write style in Wagtail:
- How to use SCSS/SASS in your Django project (Python Way)
- How to use SCSS/SASS in your Django project (NPM Way)
Other Wagtail Topics:
Introduction
From Wagtail 2.11+, please check wagtail-localize since it is more elegant, but I still recommend you to read this post to have better understanding.
In this blog post, I will talk about how to add multi-language to Wagtail, after reading, you will learn
- Two different solutions to add
multi-languageto Wagtail CMS. - How to use
wagtailtransto build page trees to implementmulti-languagefeature. - How to use
wagtail-modeltranslationto add translate fields to implementmulti-languagefeature.
Some instructions can also be found in the relevant project doc, but I want this blog can help people learn more quickly.
Preparation
Before we get started, I want to talk about some multi-language settings just in case some reader have no experience with Django
LANGUAGE_CODE = 'en'

from django.utils.translation import gettext_lazy as _

LANGUAGES = [
    ('en', _('English')),
    ('de', _('German')),
    ('fr', _('French')),
    ('it', _('Italian')),
    ('es', _('Spanish')),
]
Above config code should be added to your Django settings file, LANGUAGE_CODE is the default language or the fallback language. LANGUAGES contains the language you want support in your Wagtail project.
Solution 1: Page tree
Workflow
This solution also called duplicate tree, I will show you how it works.
In this solution, we store the english content in one page instance and german content in another page instance, all english content is under an english HomePage which has slug en and all german content is under a german HomePage which has slug de.
So the page tree in Wagtail would seem like this.
/   (RootPage, it would redirect requests)

    en/        (English HomePage)
        english-page-1/        (contains English content)
        english-page-2/
        (other english pages)

    de/        (German HomePage)
        german-page-1/         (contains German content)
        german-page-2/
        (other german pages)
From the above tree structure, we can know.
- The
RootPagewould detect requests and redirect them to the homepages. So if you visithttp://www.example.com, then you will be redirected tohttp://www.example.com/enorhttp://www.example.com/de. - All language pages have url like
http://www.example.com/{language_code}/******, the language prefix is in URL. - We can build relationship between
english-page-1andgerman-page-1, then user can easily check the translation content. (user can switch the language)
Install wagtailtrans
In previous Wagtail doc, it already talked about how to implement this feature using duplicate tree, but now we can use wagtailtrans to help us do it and do it better.
So here I will talk about how to use wagtailtrans.
First, let's install the package
$ pip install wagtailtrans
Add it to INSTALLED_APPS
INSTALLED_APPS = [
    # ...
    'wagtail.contrib.modeladmin',
    'wagtail.contrib.settings',  # Only required when WAGTAILTRANS_LANGUAGES_PER_SITE=True
    'wagtailtrans',
    # ...
]
Add wagtailtrans.middleware.TranslationMiddleware to your MIDDLEWARE (behind the SiteMiddleware), and make sure django.middleware.locale.LocaleMiddleware is not included in MIDDLEWARE (they do the same job)
Below is recommended order
MIDDLEWARE = [
    'django.contrib.sessions.middleware.SessionMiddleware',
    'wagtail.core.middleware.SiteMiddleware',
    'wagtailtrans.middleware.TranslationMiddleware',
    'django.middleware.common.CommonMiddleware',
    # other Django middleware
    'wagtail.contrib.redirects.middleware.RedirectMiddleware',
]
Page model
Now let's start working on the page model
from wagtailtrans.models import TranslatablePage


class TransHomePage(TranslatablePage):
    body = RichTextField(blank=True, default="")

    content_panels = Page.content_panels + [
        FieldPanel('body'),
    ]


class TransLandingPage(TranslatablePage):

    body = RichTextField(blank=True, default="")

    content_panels = Page.content_panels + [
        FieldPanel('body'),
    ]
Please make all pages are subclass of TranslatablePage.
After you are done, you can migrate the db
$ python manage.py makemigrations
$ python manage.py migrate

# create superuser if need
$ python manage.py createsuperuser
$ python manage.py runserver
Build page tree
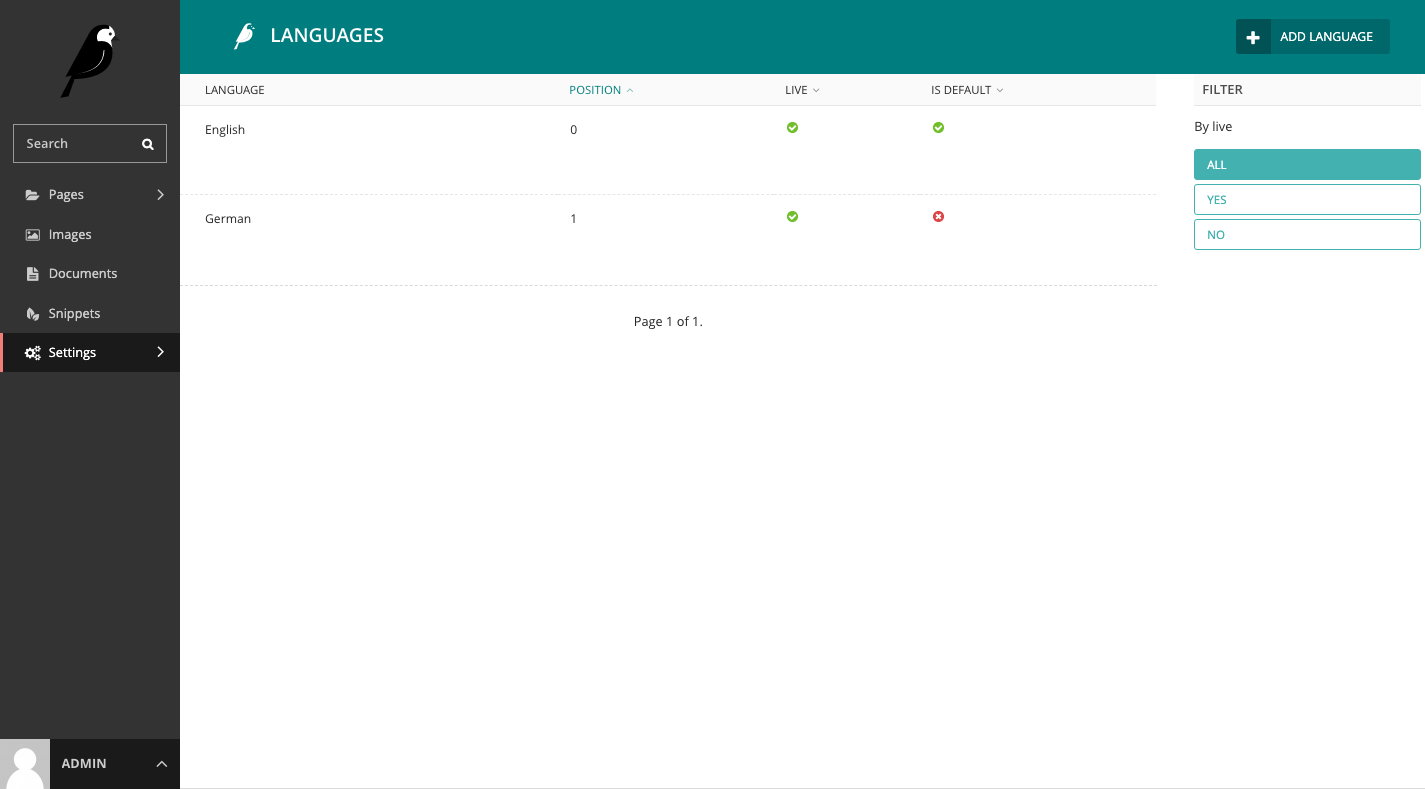
First, login Wagtail admin, go to settings/language to config the languages.

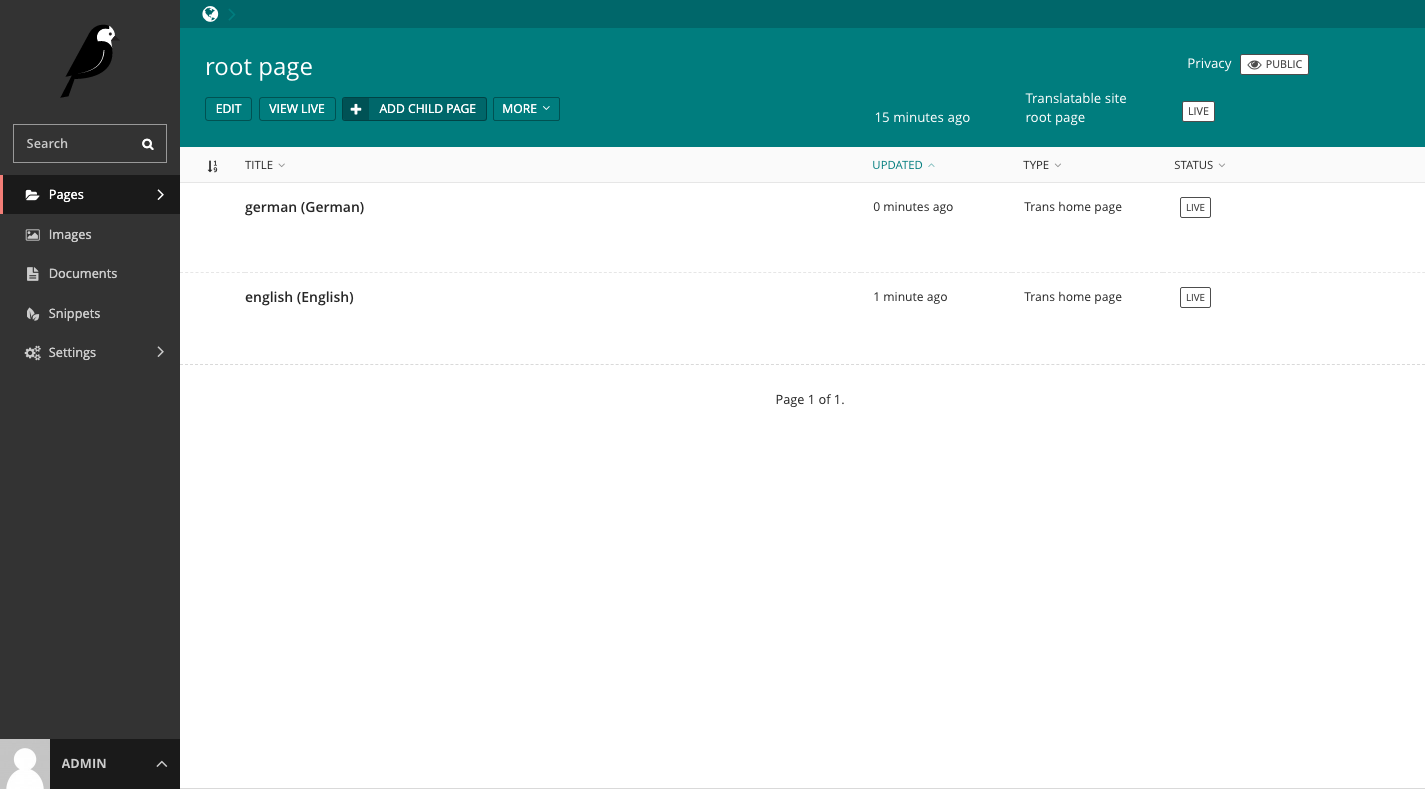
Now go to http://127.0.0.1:8000/admin/pages/, add a Translatable site root page, and then go to setting/site, make it the root page or the site.
Then you start add pages under the Translatable site root page.
First, let's create english home pages, please remember to set the slug value to en.
After you create english page, a german page (which has de slug ) would also be created automatically and in draft state, this feature is called synchronized trees.
This means that every change in your ‘canonical’ tree will also be done in the translated trees. To start using this we first need to create a default language (canonical).
You can edit, create pages to build the page tree.

Now the page tree would seem like this
/   (TranslatableSiteRootPage)

    en/        (TransHomePage)
        english-page-1/    (TransLandingPage)

    de/        (TransHomePage)
        german-page-1/     (TransLandingPage)
wagtailtrans would help us manage the relationship between english-page-1 and german-page-1/, please note that landing pages here can also have the same slug value. /de/landing/ and /en/landing/ can also work.
Templates
Because language content are stored in different page instances, so in template you do not need to do anything special.
{% load wagtailcore_tags %}
 <div class="article__body">
     <h2 class="article__title">{{ page.title }}</h2>
     {{ page.body|richtext }}
 </div>
If you want to let user switch language in page, you can use code like this in your template.
{% load wagtailtrans_tags %}

{% get_translations page homepage_fallback=False include_self=False as translations %}

{% for language, page in translations.items %}
<li>
    <a href="{{ page.full_url }}">
        <span>{{ language.code }}</span>
    </a>
</li>
{% endfor %}
Notes
wagtailtrans.middleware.TranslationMiddlewarewould detect your language setting and activate it. The activated language would still work when you visit Wagtail admin. If you visit127.0.0.1:8000/de/, and then visit Wagtail admin, you will see Wagtail admin in German, this is annoying sometimes. You can fix it by overwriting inwagtail admin/account setting/language preferences
Solution 2: Model Translation
Workflow
In this solution, we do not use page trees, we try to store all language content to one page. Let's assume we need to support en, and de in our project. And now our page has below fields
title
body
Then we can add language suffix to the field so the page can store content of different languages
title
title_en       (contains the English content)
title_de       (contains the German content)

body
body_en
body_de
-
We can
set,getthetitle_en,title_de,body_en,body_deto make it work for one language. -
When we set the
title,bodyfield, we check the currentlanguage, if we are inen, thenself.title = 'test'would set value totitle_en, if we are inde, then theself.title = 'test'would set the value totitle_de -
When we get value from
title_de, if the value is None, we should getfallbackvalue fromtitle_eninstead of returnNonevalue.
Install Wagtail Modeltranslation
Let's first install it
$ pip install wagtail-modeltranslation
Then we change urls.py to make the language prefix can be recognized. i18n_patterns
urlpatterns = [
    url(r'^admin/', include(wagtailadmin_urls)),
    url(r'^documents/', include(wagtaildocs_urls)),
]

from django.conf.urls.i18n import i18n_patterns

urlpatterns += i18n_patterns(
    url(r'', include(wagtail_urls)),
)
Make sure LANGUAGES in settings.py are already config and USE_I18N = True
LANGUAGE_CODE = 'en'

from django.utils.translation import gettext_lazy as _

LANGUAGES = [
    ('en', _('English')),
    ('de', _('German')),
    ('fr', _('French')),
    ('it', _('Italian')),
    ('es', _('Spanish')),
]

USE_I18N = True
Add the package to INSTALLED_APPS, make sure them before all apps that you want to translate
INSTALLED_APPS = (
    'wagtail_modeltranslation',
    'wagtail_modeltranslation.makemigrations',
    'wagtail_modeltranslation.migrate',
    # ...
)
Then modify MIDDLEWARE, LocaleMiddleware should be after SessionMiddleware and before CommonMiddleware
MIDDLEWARE = [
    'django.contrib.sessions.middleware.SessionMiddleware',
    'django.middleware.locale.LocaleMiddleware',
    'django.middleware.common.CommonMiddleware',
    # other Django middleware
]
In models.py
class TransHomePage(Page):
    body = RichTextField(blank=True, default="")

    content_panels = Page.content_panels + [
        FieldPanel('body'),
    ]
Then create translation.py besides model.py
from .models import TransHomePage
from modeltranslation.translator import TranslationOptions
from modeltranslation.decorators import register


@register(TransHomePage)
class TransHomePageTR(TranslationOptions):
    fields = (
        'body',
    )
If your page has more fields you want to translate, you can add them to fields
$ python manage.py makemigrations
$ python manage.py migrate --noinput
# you will see some output like this

SQL to synchronize "wagtailcore.page" schema:
   ALTER TABLE "wagtailcore_page" ADD COLUMN "slug_en" varchar(255);
   ALTER TABLE "wagtailcore_page" ADD COLUMN "slug_de" varchar(255);
   ALTER TABLE "wagtailcore_page" ADD COLUMN "slug_fr" varchar(255);
   ALTER TABLE "wagtailcore_page" ADD COLUMN "slug_it" varchar(255);
   ALTER TABLE "wagtailcore_page" ADD COLUMN "slug_es" varchar(255);


# create superuser if need
$ python manage.py createsuperuser
$ python manage.py runserver
As you can see, because page title, slug filed are in wagtailcore_page, so it need to alter the tables to add some columns.
Config in Wagtail
You can create, edit Wagtail page as normal way.
Here we create the homepage and set it as root page of our site.

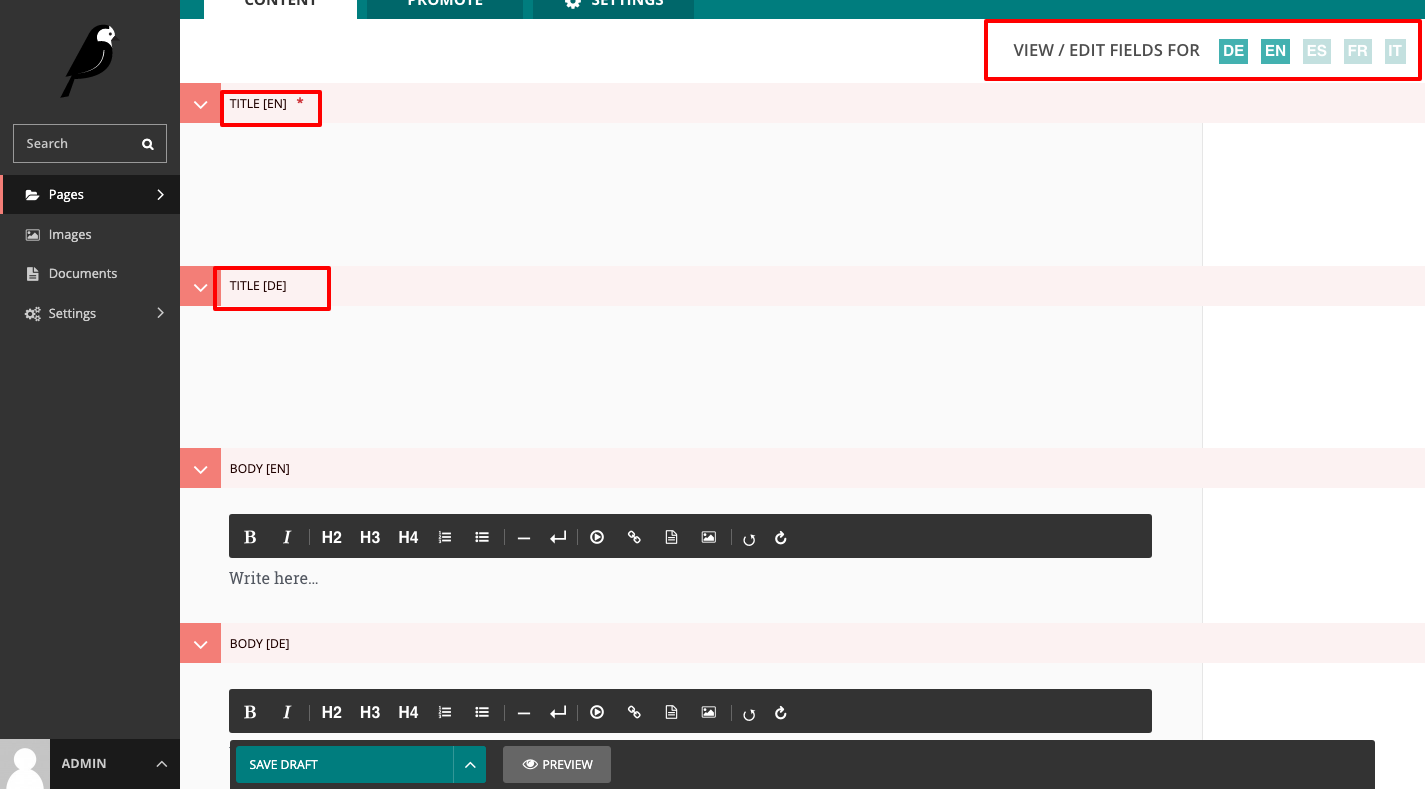
-
The top right panel can let you select which translation content to edit or create
-
You can add, edit many languages at once.
After you publish the page, now we can edit the template.
Template
As I said above, wagtail-modeltranslation can get value based on current language, so in template, you can do it in this way.
{% load wagtailcore_tags %}
 <div class="article__body">
     <h2 class="article__title">{{ page.title }}</h2>
     {{ page.body|richtext }}
 </div>
So when server receive the requests:
-
django.middleware.locale.LocaleMiddlewarewould help detect the language setting of user (from URL prefix, session, cookie). It would activate language for every requests. -
wagtail-modeltranslationwould automatically read value based on thecurrent language. So{{ page.body|richtext }}can work in different languages.
Now if you visit http://127.0.0.1:8000/en/, then english content would show up, if you visit http://127.0.0.1:8000/de/, german content would show up.
You can also check http://127.0.0.1:8000/es/, then you will understand how the fallback work in this case.
If you want user to switch the language, you can use code below
{% load wagtail_modeltranslation %}

{% get_available_languages_wmt as languages %}
{% for language in languages %}
<li>
    <a href="{% change_lang language %}">
        <span>{{ language }}</span>
    </a>
</li>
{% endfor %}
Conclusion
Which one is better? I think most people would have question like this, however, this is not easy to answer, because they solve the problem in different ways.
Here I'd like to give you my thoughts after using them in some of my projects.
Some people like wagtail-modeltranslation because editors want to edit different language content in one place, so if your client really want this then you can choose wagtail-modeltranslation. But you should also know most features of wagtail-modeltranslation is done by patching Wagtail code, so it is not easy if you want do some customization.
wagtailtrans seems not that convenient to use (editors need to edit differnt pages), but I like it more than wagtail-modeltranslation. Because the whole process is clean and simple, what is more, the translation content is stored in page level instead of model field level. So if I want to do some customization in the future, wagtailtrans would be easier for me to do it.
For Wagtail 2.11+, please check wagtail-localize since it is more elegant
Wagtail Tutorial Series:
To learn more about Wagtail CMS, please check Build Blog With Wagtail CMS (4.0.0)
- Create Wagtail Project
- Modern Frontend Techs for Wagtail
- Dockerizing Wagtail App
- Add Blog Models to Wagtail
- How to write Wagtail page template
- Create Stylish Wagtail Pages with Tailwind CSS
- How to use StreamField in Wagtail
- Wagtail Routable Page
- Add Pagination Component to Wagtail
- Customize Wagtail Page URL
- Add Full Text Search to Wagtail
- Add Markdown Support to Wagtail
- Add LaTeX Support & Code Highlight In Wagtail
- How to Build Form Page in Wagtail
- How to Create and Manage Menus in Wagtail
- Wagtail SEO Guide
- Online Demo http://wagtail-blog.accordbox.com/
- Source code: https://github.com/AccordBox/wagtail-tailwind-blog
Wagtail Tips:
- Wagtail Tip #1: How to replace ParentalManyToManyField with InlinePanel
- Wagtail Tip #2: How to Export & Restore Wagtail Site
Write style in Wagtail:
- How to use SCSS/SASS in your Django project (Python Way)
- How to use SCSS/SASS in your Django project (NPM Way)
Other Wagtail Topics:

